This post may contain affiliate links. Please read our disclosure policy.
Neapolitan Pizza Dough Recipe with a step-by-step guide to help you achieve optimal results! Neapolitan pizza is largely defined by its pillowy, chewy crust with a simple tomato sauce and puddles of fresh mozzarella cheese. This is a recipe you will make time and time again!

Here is another loved recipe with this pizza dough Pear Honey Walnut Basil Cheese Pizza.
Table of Contents
- What Is Neapolitan Pizza Dough?
- Simple Ingredients
- How to Make Neapolitan Pizza Dough
- How to Cook and Bake Neapolitan Pizza
- What Is The Best Flour For Pizza Dough?
- How To Shape Pizza Dough
- Pizza Toppings
- Equipment
- Top Tips
- How long will pizza dough last?
- Serving Suggestions
- Recipe Video
- Neapolitan Pizza Dough Recipe Recipe
What Is Neapolitan Pizza Dough?
Neapolitan pizza has a very thin crust at the base, with dough that puffs up around the sides, creating an incredibly airy crust.
The dough is very elastic (think of Italian pizza maker’s “pizzaioli” tossing and stretching that gorgeous dough). You don’t need a rolling pin for this dough.
The stretching and pulling are all done by hand.
The crust is so light that certain areas become charred very quickly, so it’s important not to overcook and completely burn this type of crust.
Simple Ingredients
- FLOUR For Neopolitan pizza, use type 0, or “00” flour. These are Italian-milled, finely ground flours with a protein/gluten content of around 10-12%, perfect for a thin, crispy pizza crust—more on flour in the next section.
- WATER The water should be around 20 degrees C (68 degrees F). When you knead the dough, the temperature will increase. That’s why the water doesn’t need to be too hot when you start the process.
- YEAST In Italy, it is most common to use natural fresh yeast or brewer’s yeast for pizza dough. You can find fresh yeast in almost all European grocery stores!
- I find natural fresh yeast very difficult to find in the United States, so I use dried Italian yeast that I like.
- You can also use active dry yeast at most grocery stores. The amount of yeast used is minimal.
- The dough ferments slowly over a longer period, so you don’t need much. I find it easier to digest when it is made this way.
- IMPORTANT TIP: The salt and yeast should not have too much direct contact when mixing the dough. Why?
- If the yeast has too much contact with the salt, it will damage the yeast cells. In turn, this will ruin the fermentation process. The salt is mixed with water and flour before adding the yeast.
- SALT Neapolitan-style pizza is made with about 2.5- 3% fine sea salt.
- The purpose of the salt in Neapolitan pizza dough is to extend the fermentation time and to improve texture and flavor. Salt slows down the yeast. When adding salt to the dough, the yeast gets less active, and you get a longer, slower rise.
- Salt helps strengthen gluten, so the dough keeps its shape during the long fermentation.
- A long and slow fermentation improves flavor and texture. The strong gluten formation makes the dough elastic and less prone to tearing.
- Can you believe the salt also helps brown and crisp the crust during baking? A lot of information about SALT! Who knew salt could play such an important role in pizza dough.
How to Make Neapolitan Pizza Dough
Here are visuals and directions for making the perfect Neapolitan Pizza Dough
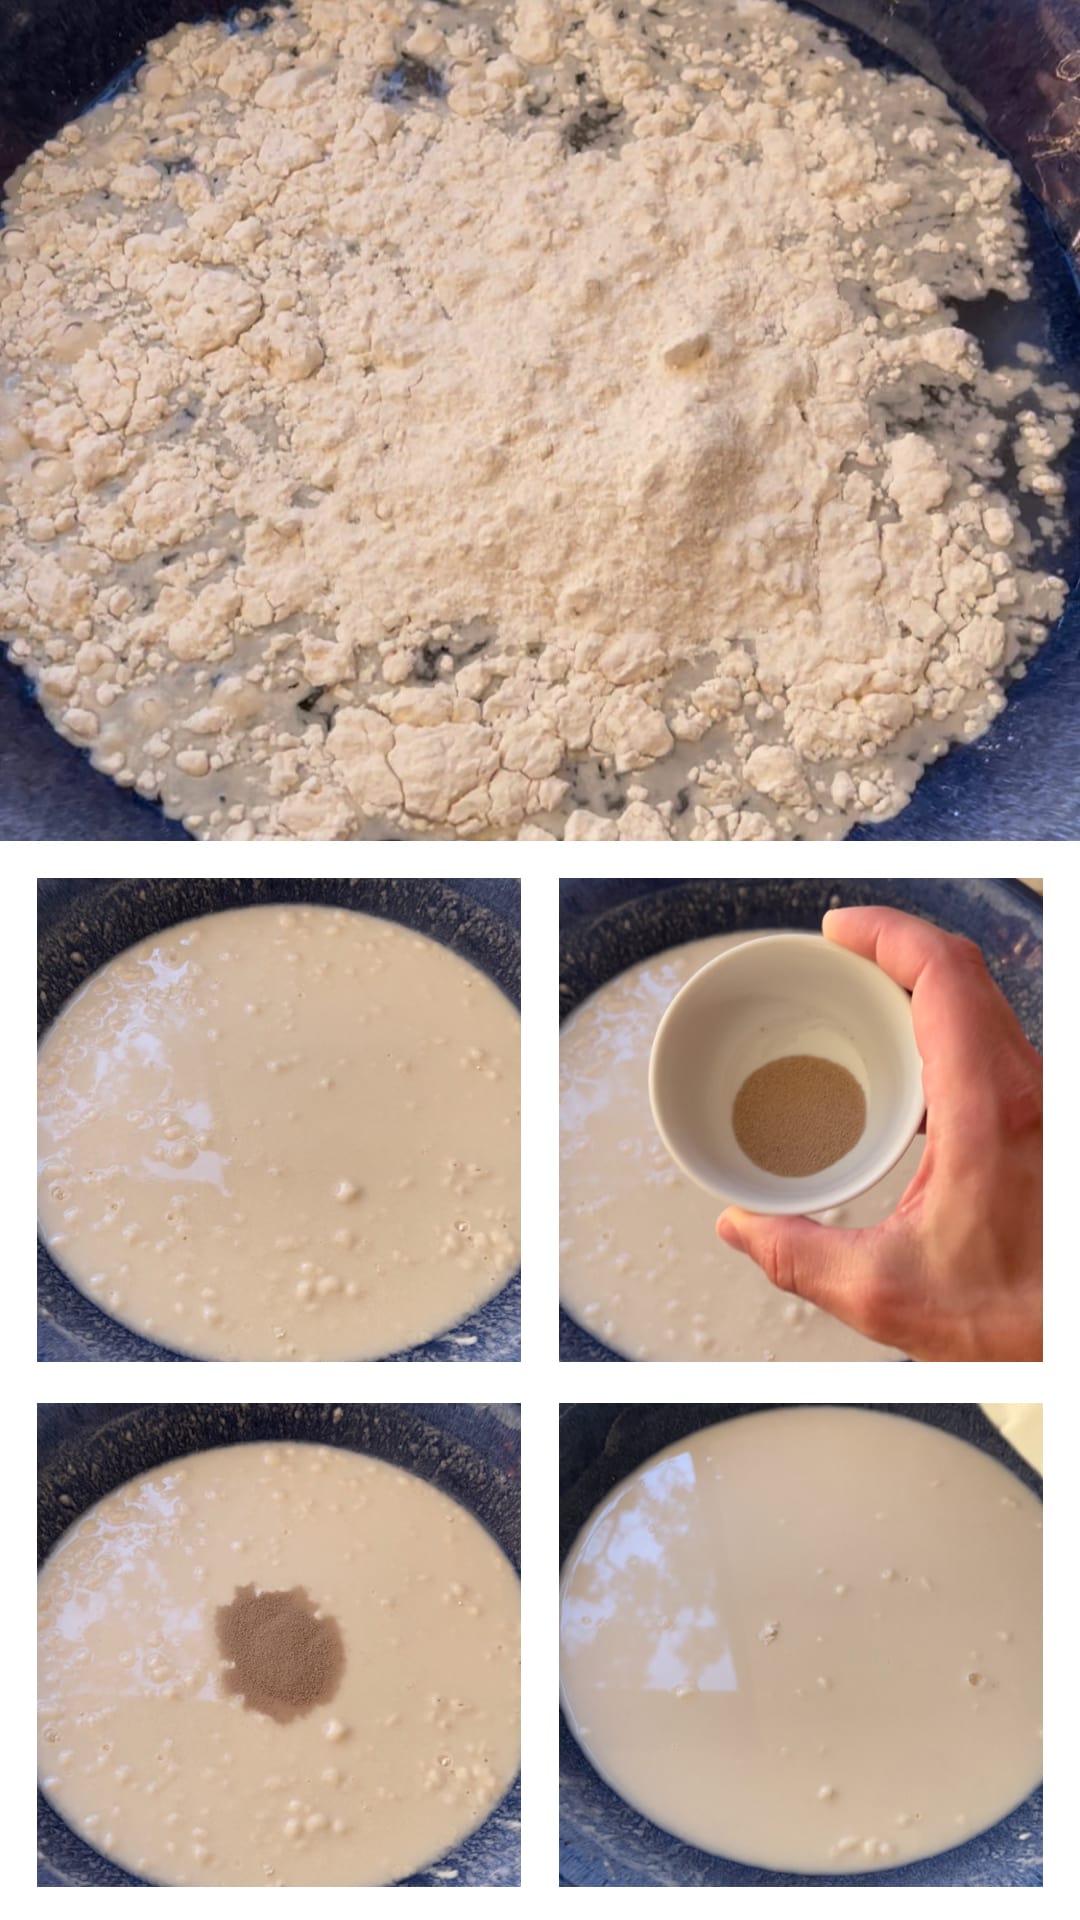
Steps from top to bottom:
1. After dissolving salt in water, start adding flour little by little
2. The mixture will be fairly liquid
3 & 4. Add yeast.
5. In a large bowl, dissolve yeast by mixing by hand in the salt, water, and flour until combined
Steps from top to bottom:
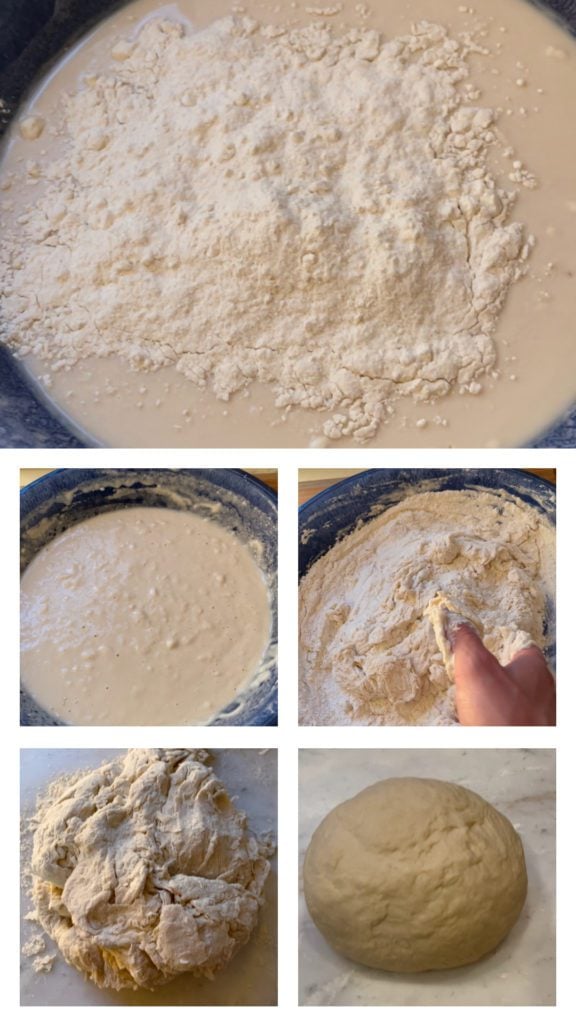
1-3. Start adding flour little by little to the bowl and working with your hands.
4. Once the dough is more solid move it to a floured work surface.
5. It may take 15-20 minutes of kneading to get a smooth dough ball.
Steps from top to bottom-
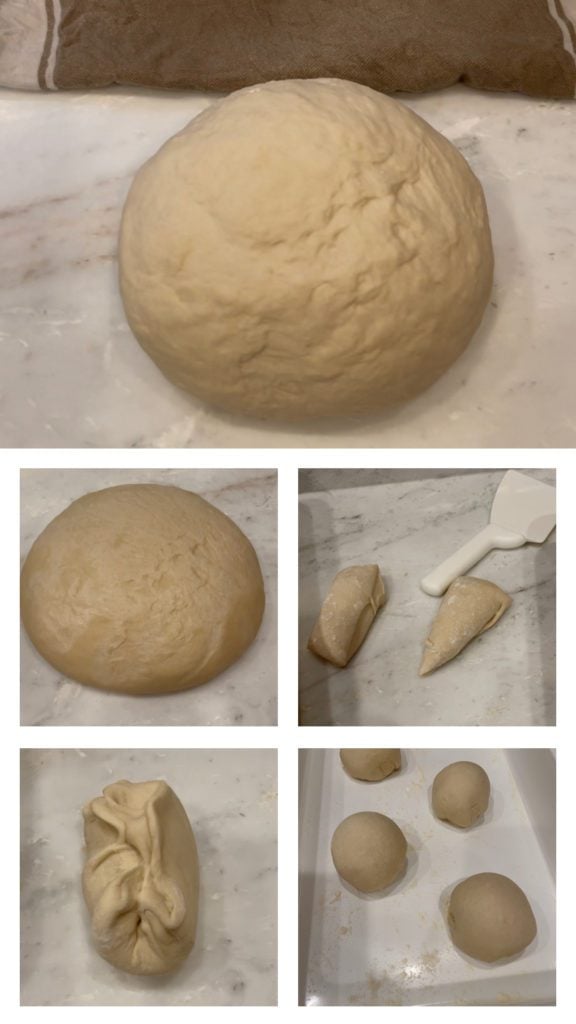
1. Cover the dough ball with a damp cloth for about 2 hours.
2. Uncover the risen dough.
3. Divide the dough into about 8 pieces
4. Pinch method to make a smooth dough ball (use “pinch and tuck” method in recipe steps.
5. Place the dived dough balls in airtight container for final rise (2 boxes with 4 dough balls in each).
How to Cook and Bake Neapolitan Pizza
Neapolitan pizzas are also cooked at very high temperatures (800 F to 900 F) for no more than 90 seconds. We use our Gozney RoccBox to get the heat take this pizza to the next level.
If you don’t have a high heat pizza oven cook it in your oven at the hottest setting 550 degrees F, preferably on a pizza stone.
Make sure to let your oven heat 30 minutes, with the pizza stone, before baking your pizza pie for the highest heat possible.
Pizza Stone I recommend if you are using a regular oven. We’ve owned this one for 10 years!
What Is The Best Flour For Pizza Dough?
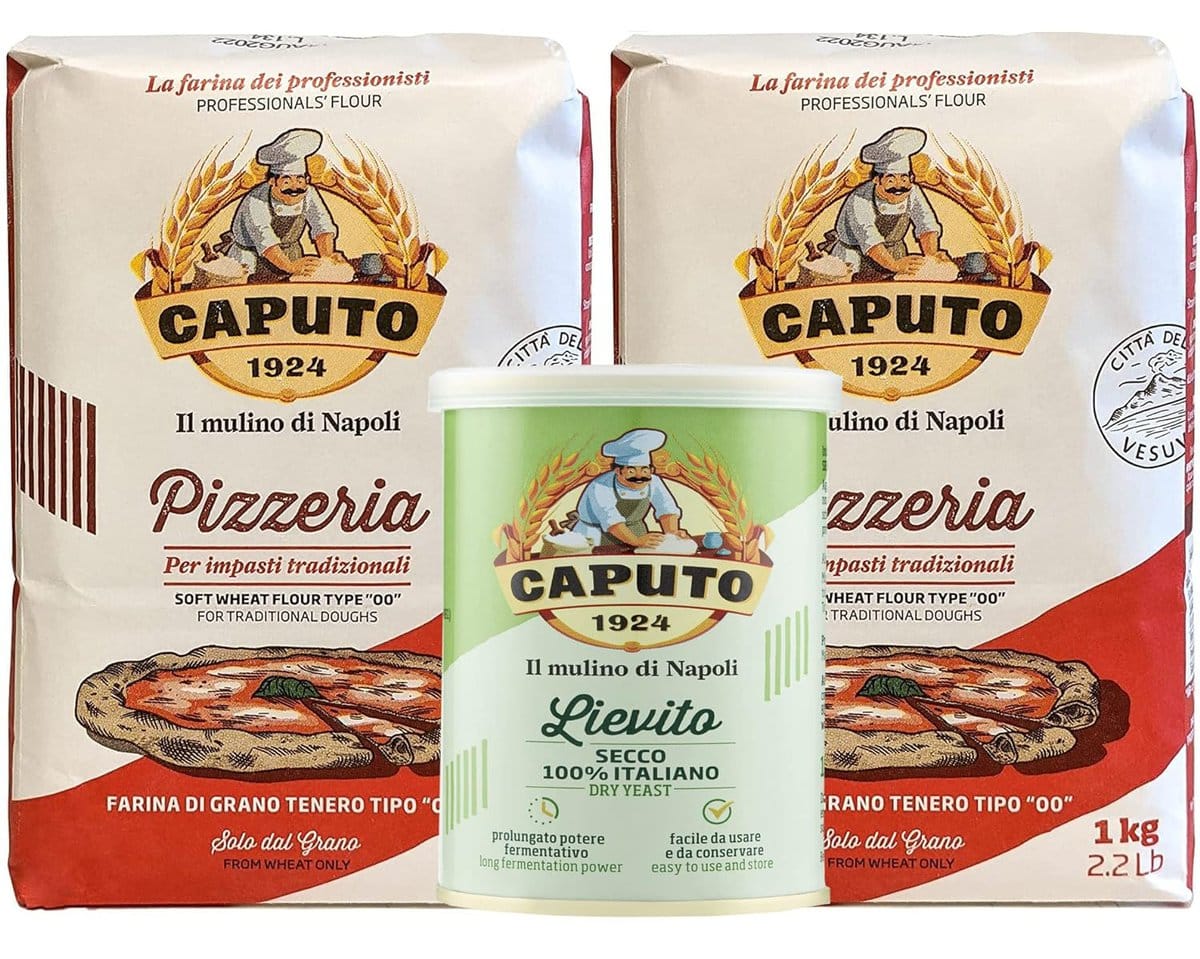
I highly recommend using the Caputo “00” pizzeria flour and Caputo lieveto (dry Italian yeast).
It is the flour the pizza makers use in Italy. I talked to several this summer, and they agree this is the best!
Take it from the true Italian “pizzaiolo” and use this flour and yeast for the best results.
Why is 00 Flour Best for Pizza Dough?
Caputo 00 flour is ideal for pizza dough for two reasons: one, it’s finely ground, and two, it has a lower gluten content than most flours.
The “00” refers to the texture of the flour: Italian flours are classified by numbers according to how finely they are ground, from the roughest ground “tipo”1, to 0, and the finest 00.
Gluten, the natural protein that remains when starch is removed from wheat grains, creates the elasticity you feel when you bite into a crunchy loaf of bread.
The lower the flour’s protein content, the lower the gluten, and the lower the gluten, the less elasticity there will be in your dough (cake flour has the lowest gluten level).
Gluten levels are controlled by selecting different strands of wheat for processing: high-gluten bread flour is made from wheat that has 14-15% gluten.
Meanwhile, the Caputo 00 is made from the finest grains the Caputo family can find to give your dough just enough, but not too much, stretch at 12.5% gluten. It is ideal for making pizza dough!
Can I Substitute all-purpose flour or Bread Flour for 00 Flour?
Bread flour is the best substitute for 00 flour when making pizza. It has a high gluten content, ensuring the dough will still be smooth and stretchy.
Although it is not as fine as 00 flour, it will still work and will yield you great pizza dough.
How To Shape Pizza Dough
Thanks to my dear husband Dr. Jordan Davis, for helping with this video!

For this recipe, you can also use all-purpose flour, but the consistency will be a bit firmer, and the dough will not be as stretchy.
I do not recommend it to achieve optimal results. Here is a link that bundles the pizza FLOUR and YEAST.
It is the best price I found for you! BUY IT: PIZZA FLOUR AND ITALIAN DRY YEAST

Pizza Toppings
The most authentic Neapolitan pizza toppings are mozzarella, tomato sauce (usually made with San Marzano tomatoes), and basil, also known as Pizza Margherita. However, the sky is the limit as far as toppings. Read more about Different Types of Mozzarella.
Make it your own with your favorite toppings.
Don’t make it too heavy with toppings, or this style of pizza will have a hard time sliding in and out of the oven!

Ratios for Sauce and Cheese
- 1 dough ball (about 250 gr). Use this recipe for the dough.
- Raw tomato sauce puree (180 grams ). Brands I like: Mutti, Cento, and Bianco Do not use canned, pre-made, or seasoned sauces.
- Fresh Mozzarella (about 70-85 grams). Must use fresh mozzarella packed in water. You can also try buffalo mozzarella!
- Fresh Basil (about 3-4 leaves)

There you have it, the icon Italian flag colors painted in one the most memorable images to Italian cuisine- “la pizza Napoletana”.
From my heart and cucina to your table, I hope you enjoy this recipe time and time again. A true taste of Italia at your table.
You will hear the voices of the Italians saying, Mangia! Mangia! (eat!) after you make this pizza, pizza, pizza the authentic Italian way!
Equipment
I love this Euro Design Pizza Peel
LINK TO THE DOUGH CONTAINER WE LOVE!

Top Tips
- Use THIS flour and yeast
- Do not let the yeast and salt come in direct contact with one another (I explain why above)
- Let it rise the proper time as the recipe suggests
- Let dough balls rise in a good air tight container .
- If making in a regular oven, preheat for half an hour or so at high heat, aiming for a stone temperature of around 800°F to 900°F.
How long will pizza dough last?
Storing your pizza dough the right way will change your homemade pizza life! Read How long Does Pizza Dough Last in the Fridge? for ALL your pizza storing needs.
If you have leftover pizza dough, want to save time and work before the next pizza night, make a big batch of dough to store, or love the convenience of having pizza dough ready, you need to know how to store pizza dough properly.
I recommend storing pizza dough when they are already divided into balls.
You can also try using this Marinara Sauce for your pizza.

Serving Suggestions
This delicious and authentic pizza recipe serves as the main course. Side ideas include Arugula, Apple, and Pistachio Salad in Parmigiano Cups, Italian Salad Pears, Walnuts, and Gorgonzola, Crispy Brussels Sprouts Recipe, and Italian Fennel, Citrus, Pomegranate and Salad.
Don’t forget dessert! Try Classic Italian Tiramisu (without alcohol), Italian Cream Crumb Cake (sbriciolata alla crema), Simple Italian Apple Cake (one bowl), or Frozen Lemon Dessert (Creamy Lemony Treat).
You may also want to try: Authentic Homemade Pappardelle Pasta Recipe and How to Make Homemade Ravioli- Italian Recipe!
More Delicious Recipes for YOU
Tomato Herb Focaccia (Best, Easiest Recipe)
Authentic Italian Amatriciana Sauce
Easy Italian Tortellini Pasta Salad (Vegetarian)
Italian Frittata Recipe with Spinach
Italian Style Pasta Salad Recipe (with Arugula)
Easy “Crack” Lemon Bars (Winning Recipe)
Recipe Video
Recipe Adapted from: Vincenzos Plate. A big thank you to Vincenzo for teaching us the way with this recipe!
Make it a family affair and get everyone involved if you make this recipe, don’t forget to return it and leave a STAR rating and comment. Thank you! You will want to try pizza dough this way. It is worth the effort!
Print
Neapolitan Pizza Dough Recipe
Authentic Neapolitan Style Italian Pizza Dough Recipe! Chewy and crisp this is the type of pizza you get when you are in Naples. The pizza dough you’ve been waiting for is here! Jordan, my husband, is the real master behind perfecting this dough. Neapolitan pizza is largely defined by its pillowy, chewy crust.
- Total Time: 5-15 minutes
- Yield: 8 servings 1x
Ingredients
- 600 ml – 2.5 cups water (room temperature) + 1 teaspoon warm water
- 1 kg – 35 oz Pizza Flour, Tipo 00
- 30 g – 5 teaspoons of salt
- 1–2 g – half teaspoon of dry yeast
Instructions
- Pour water and add salt into a large mixing bowl. Mix well with your hands to help dissolve the salt. Add 100g (10% flour) to the water and mix it through with your hands until the flour dissolves. This will result in a crepe/pancake consistency. Next, add the yeast to the salt, water, and flour mixture helping it melt in the water using your fingers. Mix with your hands until completely combined.
- Important: start adding the flour a little at a time. Add flour with one hand and mix to combine with your other hand as you go. Scrape the sides of the bowl to make sure no flour is wasted.
- Once the dough has started to come together really well, flip it out on to a bench and start to knead it with both hands absorbing all the remaining flour. Keep working the dough until you find it has come together and has a smooth consistency. Knead the dough by stretching it and fold it over itself to strengthen the gluten strands, and to add air into the dough. But be careful not to stretch the dough so much that it tears. This will develop the gluten in the dough, and make it elastic and stretchy. The kneading process will take around 15-20 minutes. To check if your dough is ready to rest: press down on the dough ball with one finger and if it bounces back, chances are, it’s ready!
- Once ready, place the dough aside to rest on a flat surface, covering it with a damp cloth so it doesn’t dry out. Leave this to rest for at least 2hr.
- Once 2hr have passed, it’s time to make your dough balls. To do this, cut a piece of your dough and weigh it on a scale aiming for 250g/8.8oz. You should have about 8 dough balls. To make the dough ball, the easiest way, “pinch and tuck method”: place small dough chunk on floured surface push down on four corners of the dough with thumb and index fingers.
- Pinch thumb and index finger together grabbing the dough. Lift the dough up off the floured surface and tuck and pinch the corners together on the underside of the dough. As you do this, the dough on the upward facing portion should stretch creating a smooth surface. Place the pinched side facing down on the floured surface and rotate the dough a quarter turn. Repeat 4-5 times until a nice ball has formed
- Once you have made the dough balls, place them in a flat surface covered in plastic wrap, or air tight container. Leave at room temperature for 24hr. IT IS WORTH THE WAIT!
- After 24hrs your dough balls should have risen and are ready to use. Sprinkle flour on to the bench, placing the dough on top and starting an inch from the bottom and working your way an inch from the top, press down using your fingers. Then stop, turn it over and repeat until you have a small round base with a “cornicione” (crust).
- Gently stretch this by then picking up the dough and slightly stretching it onto one forearm then flipping it onto the bench. Repeat this before shaping it into a circle and then resting it on your bench.
Cooking the Pizza
- Heat Oven to hottest setting 550 degrees F with pizza stone in the middle rack, or heat your professional pizza oven to 750-900 degree F. If using your regular oven, let it heat for 30 minutes with the stone to get the stone really hot.
- Add tomato puree as desired onto the flattened dough and put pizza in the middle rack of the oven on a pizza stone, baking at 550 degrees F. about 10-15 minutes. If using a real high heat pizza oven of 900 degrees F the cooking time is 5 minutes. Add the fresh mozzarella half way into the baking time in the regular oven. Other ingredients such as extra virgin olive oil and basil should be added at the end of cooking about 1 minute before taking out of the oven, or simply add after baking. If desired you can add the fresh mozzarella after the pizza and sauce are completely done cooking and the cheese will remain “fresh”. MANGIA! MANGIA! (EAT!)
Notes
Make it a family affair and get everyone involved. If you make this recipe don’t forget to come back and leave a STAR rating and comment. I love connecting with you through my recipes. Thank you!
- Prep Time: 20 minutes+ 24 hours (includes rising time)
- Cook Time: 15 minutes
- Category: Savory
- Method: Italian
- Cuisine: Italian



Everything I make of yours Elena is absolutely fabulous. Yes, these recipes are true to real Italian food!
Thank you! Yes, I put all my heart into these Italian recipes. Enjoy
I’m having a hard time believing that this recipe really asks for 5 teaspoons of salt to 2.2 lbs of flour. I’m going to be making this for a birthday party on Saturday
And will not have time to remake it if this is a typo. Can you please confirm this for me.
Thanks!
It’s NOT a typo. This recipe has been tried and tested hundreds of times and made by thousands of people on the internet. You can trust that all recipes on this website are tested and approved. I hope you have a wonderful pizza party!
Hi Elena,
Thank you so much for all your hard work on this recipe! I started it yesterday and have attempted to do everything exactly as you stated. Everything looked perfect when I went to sleep last night. When I woke up, the dough balls had risen enough to completely fill the inside of their air tight container.
How bad have I messed up? If I cook this is it going to work? Any idea what I may have done wrong?
Hi matt, you did everything correct. It may have been a little bit too warm and so they rose quickly. Even if they expand they will still turn out in the end after shaping and baking. Enjoy.
Hi there
just wanting to freeze dough for later use. After the 24 hour ferment is when I freeze correct? And also do I oil the dough balls and then put in ziplock bags for the freezer? After thawing at room temp will it rise again?
thanks Shawn
Yes! That is when you freeze. No oil needed just a bit of flour. Enjoy!
Hi,
Can I use a stand mixer with a dough hook instead of hand kneading?
Hi! Yes, you can.
How long roughly should I knead for with a stand mixer?
Thank you!
About 10-15 minutes until smooth and elastic. Enjoy!
Hi Elena,
I made the dough over the weekend, as per the recipe, though when I was shaping it I found it really elastic that it was hard to shape and would bounce back. Any tips? I used the caputo flour and yeast, left at room temperature for 24 hours. Thank you
Hi Mikayla! I can’t be sure since I didn’t see the dough- but was there not enough flour? Did you weigh the flour? Do you mean it was hard to shape after the second rise? I am trying to figure out more to help you get the best results!
Hi Elena,
Yes I weighed the flour, using 1kg.
The dough was hard to shape after the second rise into a pizza. Only as it kept bouncing back. It just seemed maybe too elastic. Maybe I need to just practice and work on my technique. I will try again this weekend! Do you flatten it out first before pressing the air to the edges?
The dough should be elastic! Yes, it is just a matter of working and getting used to it. You can use a rolling pin to help you at the beginning. Let me know how it goes!
absolutely love this recipe. my family said it was the best pizza crust ever. and I halfed it and it still worked out.
Yay! Thrilled you and the family loved it :).
I am going to try this today! At what point in the process should I freeze what dough I am not going to use?
Just after making the dough balls or after the rise?
Thank you very much!
Hi! You can freeze after the rise.
Hi Elena.
Going to make the dough today. It’s just the two of us so I plan to freeze some of the dough. I noted that you have information on fridge and freezer storage in another post which I have read. However, its not clear to me… should I freeze the dough after the 24 hour fermentation or just after I form the dough balls. Look forward to your direction! Don’t want to mess this up!
Thanks much!
Hello! You will freeze the dough after the fermentation. Enjoy!
I made this recipe using half, and with all purpose flour and it turned out really nicely! I’ll definitely be using it again, thanks for the recipe!
Happy you enjoyed it! It is one to make often for pizza night. Enjoy.
We had just been gifted an early Xmas gift… a pizza oven but we were having the hardest time using the manufacturer’s dough recipe… it was too sticky and hard to work with, it would shrink and it would puff up in the oven. That’s when I came across your blog. I bought the special yeast, flour and dough proofer. GAME CHANGER!!! Even my husband was impressed! This will give us so much more confidence to have friends over for pizza night! I’m excited to try your other recipes!
Hi Julie! This recipe is as authentic as it gets and foolproof! I hope all your pizza dreams come true. It is a great recipe when friends come for a pizza night. Enjoy all the other delicious recipes.
This pizza crust was amazing! Best one I’ve ever tried.
Happy you loved it. After perfecting it over the years, I can say it is the best we’ve had as well.
I’m sorry, maybe it’s not loading fully. but there is no measurement for how much flour, water and yeast. how much do I use?
Hello Alex, it must not be loading properly for you. All the measurements are on the recipe card at the bottom of the post. Best, Elena