Classic Spritz Cookies
This post may contain affiliate links. Please read our disclosure policy.
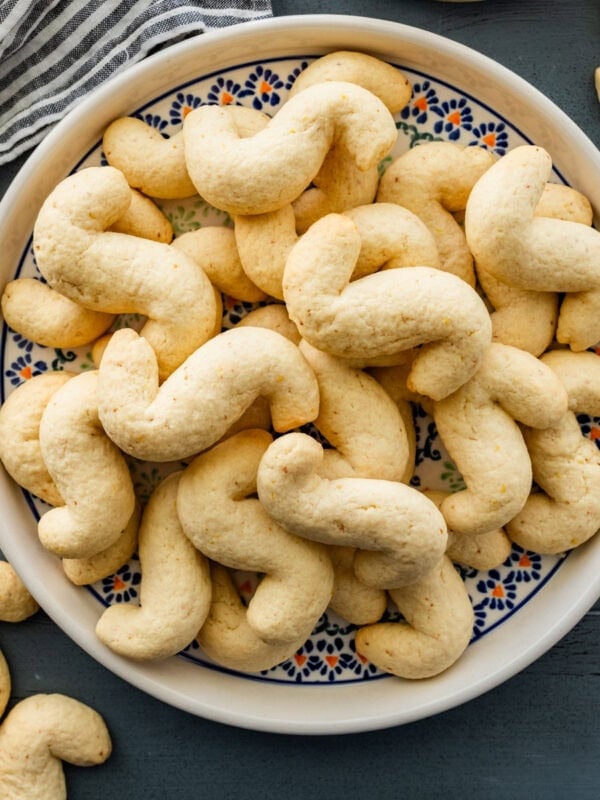
Grandma Sharon’s classic spritz cookies have been a tradition on the holiday cookie tray for decades. This tried-and-true recipe is one to cherish and make time and time again! You can customize your cookies with different shapes, sizes, and colors, adding festive sprinkles for the perfect holiday gift.
You’ll also love my Italian butter cookies and Anginetti cookies.

Why you’ll love these cookies…
Easy to make and beautiful to serve, this spritz cookies recipe will become your new go-to family favorite!
- Rich Buttery Flavor: The high butter content gives these cookies a melt-in-your-mouth texture that’s irresistibly delicious.
- Easy to Prepare: With simple ingredients and straightforward steps, this recipe is perfect for bakers of all skill levels.
- Beautiful Designs: Using a cookie press allows you to create intricate and festive shapes effortlessly (think Christmas trees, flowers, snowflakes, and more), making your cookies look bakery-worthy.
- Quick Baking Time: They bake in just 7-8 minutes, so you can enjoy freshly baked cookies in no time.
- Perfect for Sharing: The recipe yields a large batch, making them ideal for parties, cookie exchanges, or gifting to friends and family.

Table of Contents
Simple Ingredients
Each of these simple ingredients works together to create the perfect balance of flavor, texture, and appearance in these traditional spritz cookies!

- All-purpose flour: This is the base of the cookie dough, giving the cookies structure and a tender crumb.
- Baking powder: Helps the cookies rise slightly, giving them a light, airy texture.
- Salt: Enhances the flavor of the cookies by balancing the sweetness and bringing out the buttery notes.
- Butter: The key to the rich, buttery flavor and soft texture of spritz cookies. Using softened butter helps the dough come together smoothly.
- Granulated sugar: Adds sweetness to the cookies and helps create a slightly crisp exterior while keeping the inside soft.
- Egg (room temperature): Acts as a binder to hold the dough together and provides structure to the cookies.
- Vanilla extract: Adds a classic, warm, and sweet flavor that complements the buttery dough.
- Almond extract: Adds a hint of nutty sweetness and gives spritz cookies their signature flavor.
- Sprinkles or colored sugar (optional): Used to decorate the cookies and add a festive touch before baking.
- Food gel coloring (optional): A fun way to add vibrant color to your cookies. Gel coloring works best as it doesn’t alter the dough’s consistency.
Tools:
- Cookie Press (THE BEST ONE!)
- Baking Sheet
See the recipe card for quantities.
How to Make Spritz Cookies
Despite their elegant appearance, they’re surprisingly simple to make, impressing guests without the hassle. Follow these step-by-step photos and see the recipe card at the bottom of the post for more.

Cream the butter and sugar in a stand mixer or in a large bowl using handheld beaters.

Add the egg and extracts, then mix and incorporate.

Add the baking powder, flour, and salt to the wet ingredients.

Combine wet and dry ingredients to make a cookie dough.

If desired, add food gel to some of the dough to make different colors.

Use a good-quality cookie press! Mine is linked in the recipe card and I highly recommend it.

Make sure to use an ungreased cookie sheet and not parchment paper—this makes it easier for cookies to stick to the baking sheet and not spread.

Note: some sprinkles will bleed while baking. If desired, you can brush the cookies with a little corn syrup after baking and then add sprinkles so they stick better.

Place cookies in a preheated oven and bake until slightly golden- careful not to overbake. If desired, sprinkle the tops of the cookies with colorful sprinkles or sanding sugar before baking.

Place on a wire rack to cool completely.

Recipe Variations
Here are a few fun recipe variations for Classic Spritz Cookies:
- Chocolate Spritz Cookies: Replace ¼ cup of the flour with unsweetened cocoa powder for a rich chocolate flavor.
- Citrus Spritz Cookies: Add 1-2 teaspoons of lemon or orange zest to the dough for a bright, zesty twist.
- Spiced Spritz Cookies: Mix in ½ teaspoon of cinnamon, nutmeg, or pumpkin spice to give the cookies a warm, spiced flavor.
- Glazed Spritz Cookies: Drizzle the baked cookies with a simple powdered sugar glaze (mix powdered sugar, milk, and vanilla extract) for extra sweetness and decoration.
- Chocolate-Dipped Spritz Cookies: Dip half of the baked and cooled cookies in melted chocolate (white, dark, or milk) and sprinkle with chopped nuts or sprinkles.
These variations can be easily adapted to your taste and are perfect for bringing a new twist to your classic spritz cookies!

My Pro Tip
Recipe Tips
- Use softened, but not melted butter: For the best texture, ensure your butter is softened to room temperature. It should be soft enough to blend but still hold its shape.
- Chill the dough if needed: If the dough becomes too soft or sticky to work with, chill it for 10-15 minutes. This makes it easier to press through the cookie press and maintain the shape.
- No greased baking sheets: Avoid greasing the baking sheets; this helps the dough grip the surface, allowing the cookie press to form clean shapes.
- Even pressure with the cookie press: For uniform cookies, apply consistent pressure when using the cookie press, and hold it close to the baking sheet before pressing.
- Color in small batches: If using food gel coloring, add a little at a time. You can always add more, but too much coloring can affect the dough’s consistency.

FAQs
Spritz cookies are classic, buttery cookies that are pressed into decorative shapes using a cookie press. They have a light, tender texture and are often flavored with vanilla or almond extract. They’re popular during the holidays but perfect for any time of year.
Yes! While a cookie press makes creating shapes easy, you can also roll the dough into small balls and flatten them with a fork or the bottom of a glass for a simple, round cookie. You can also pipe these cookies using a piping bag and a piping tip. You may need to refrigerate the dough slightly to work with it this way.
If your spritz cookies are spreading too much, it could be because the butter was too soft. Soft butter is just enough to press your finger and make an indent. if you can push your finger all the way through it is too soft. Make sure the dough is firm but not too cold, and avoid greasing the baking sheet, as this can cause spreading.
Absolutely! You can make the dough ahead of time and store it in the fridge for up to 3 days or freeze the shaped unbaked cookies. Baked cookies can also be stored in an airtight container for up to a week or frozen for up to 3 months.
Nonpareils, sanding sugar, or jimmies (long, thin sprinkles) work best. These sprinkles don’t melt or bleed into the dough while baking, ensuring the cookies stay colorful and festive.
The name “spritz” comes from the German word “spritzen,” which means “to squirt” or “to press.” This refers to the method of pushing the dough through a cookie press to create intricate shapes.
Storage Instructions
- Room temperature: Place fully cooled cookies in an airtight container. Store at room temperature for up to 1 week. Layer the cookies with parchment or wax paper between them to prevent sticking.
- Freezing: For longer storage, freeze the cookies. Place them in an airtight, freezer-safe container or zip-top bag, with parchment or wax paper between layers. They can be frozen for up to 3 months. Thaw at room temperature when ready to enjoy.

Other Cookies Recipes
Looking for other recipes like this? Try these:
💙 MADE THIS RECIPE AND LOVED IT? 💙 Please leave a ⭐️STAR rating and COMMENT below- I love connecting with you! Tag me with your creations on Instagram and find me on Pinterest.
Spritz Cookies Recipe

Equipment
- Cookie press THE BEST ONE!
Ingredients
- 3 ½ cups all-purpose flour
- 1 teaspoon baking powder
- ½ teaspoon salt
- 1 ½ cups unsalted butter, softened*, 3 sticks
- 1 cup granulated sugar
- 1 egg, at room temperature
- 1 teaspoon pure vanilla extract
- 1 teaspoon pure almond extract
- Sprinkles or colored sugar, optional
- Gel food coloring, optional
Instructions
- Preheat the oven: Set the oven to 350°F (175°C). Line baking sheets with parchment paper or leave them ungreased for best results.
- Cream butter and sugar: In a large mixing bowl, cream the softened butter and sugar together until light and fluffy, about 2-3 minutes. You want the mixture to be pale in color and airy for the best cookie texture.
- Add egg and extracts: Beat in the egg, vanilla extract, and almond extract until fully incorporated.
- Add dry ingredients: Sift in the dry ingredients (flour, baking powder, and salt) into the bowl with the wet ingredients. Beat on low speed until just combined then finish combining with a rubber spatula. The dough should be soft but not sticky. Do not overmix.
- Tinting Dough (optional): If coloring some of the cookie dough, divide it into parts. I used white and green, so I split it evenly into two parts. Use the gel color to tint the dough. Add a few drops to start, then add more as needed. You can always add additional color, but you can’t remove it! If you add too much liquid, it can thin out your cookie dough.
- Use a cookie press: Fill your cookie press with dough according to the manufacturer's instructions. Press the dough directly onto the UNgreased baking sheets- do NOT line with parchment paper (this helps the cookie stick to the sheet well; greasing the sheet will also cause the cookies to spread), spacing the cookies about 1 inch apart.
- Optional – Add sprinkles: If desired, sprinkle the tops of the cookies with colorful sprinkles or sanding sugar before baking. Note: some sprinkles will bleed while baking. If desired, you can brush the cookies with a little corn syrup after baking and then add sprinkles, so they stick better.
- Bake: Bake in the preheated oven for 7-8 minutes, or until the edges are just turning golden. Be careful not to overbake, as spritz cookies should remain soft and tender.
- Cool: Let the cookies cool on the baking sheet for 2 minutes before transferring to a wire rack to cool completely. Enjoy these timeless, buttery cookies! They’re perfect for sharing and decorating with loved ones.
- Storage: Store the cookies in an airtight container at room temperature for up to a week, or freeze for up to 3 months.
Notes
- Use softened but not melted butter: For the best texture, ensure your butter is softened to room temperature. It should be soft enough to blend but still hold its shape. This is the biggest tip for this type of dough.
- No greased baking sheets: Avoid greasing the baking sheets; this helps the dough grip the surface, allowing the cookie press to form clean shapes.
- Even pressure with the cookie press: For uniform cookies, apply consistent pressure when using the cookie press, and hold it close to the baking sheet before pressing.
- Bake one sheet at a time: To ensure even baking, bake one tray of cookies at a time in the center of the oven. Rotate the tray halfway through if your oven heats unevenly.
- Watch for slight golden edges: Spritz cookies bake quickly. Look for the edges to just begin turning golden for the perfect balance between softness and crispness.
- Keep egg at room temperature: Ensure your egg is at room temperature before adding it to the dough. This helps the ingredients blend more smoothly, creating a cohesive dough.
- Sift the flour: Sifting your flour can help aerate it, ensuring lighter, more tender cookies.
- Color in small batches: If using food gel coloring, add a little at a time. You can always add more, but too much coloring can affect the dough’s consistency.
- Cool completely before storing: Make sure the cookies are fully cooled before storing them in an airtight container to prevent moisture from softening them.
Nutrition
Nutrition information is automatically calculated, so should only be used as an approximation.


These are my favorite Christmas cookies and this recipe is simple and tastes just right.
Yes! I love this recipe too, and spritz cookies are the best!
I made these cookies yesterday and they are perfectly beautiful! I was unable to eat them as I have Celiac Disease and am gluten-free, but when my husband (he is my taste tester!) took a bite and raised his eyebrows, I knew they were a winner! He said these were better than the recipe I have been making for years. Thank you so much for this recipe. It will be added to my repertoire of cookie recipes!
Yay! this truly is the yummies spritz cookie recipe. You can try it with Cup4Cup gluten free flour for yourself next time!
Hi there going to make these cookies , but wondering if you. Sent a recipe for ones as an appetizer with cheese in them